|
Dru Blair's Color Buffer Theory™
(partial version)
This is an overview to explain a small fraction of Dru's theory. A complete and in-depth study of these concepts is presented at the workshops.
Note: Dru Blair's Color Buffer Theory™ is too complex to be fully comprehended from reading this article or attending just 1 workshop. Experience has shown that it takes at least 3 workshops to gain full comprehension. While a student will understand everything Dru conveys at his workshops, assimilating and retaining all of the information as a whole is impossible from just one exposure. For that reason, we recommend that students take extensive notes during Dru's workshops for later review.
Beware of other artists attempting to teach Dru's Color theory. Improperly trained and non-qualified artists will not grasp important concepts and therefore incorrectly convey Dru's material. A large majority of Dru's recent research (from 2000-2006) was just added to the curriculum, making many of his older techniques obsolete. At this time, only Marissa
and Eddy Wouters are qualified to teach Dru's Color Buffer Theory. If you are unsure about who's workshop to attend, let the quality of the instructor's work be your guide.
|
Dru Blair's Color Buffer Theory ™ was devised to remedy challenges associated with color matching and color shift. The term "buffer" refers to the limiting effect of opaque white paint added in specific proportions to control darkness and color saturation.
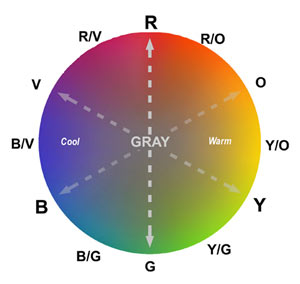
The foundation of Dru's system rests on his color wheel (figure 1) and the relationships between the colors positioned around it. Dru's wheel differs from other color wheels, such as the Munsell wheel, in that every color on the wheel has a corresponding complementary color that can
be determined by drawing a straight line though the center to the opposite side of the wheel. Observe that colors inside the wheel are less saturated or closer to gray.
|
Figure 1
The standard color wheel used by most artists demonstrates interaction and relationships between opaque colors. Complementary
colors lie opposite to each other on the wheel. Examples of corresponding complementary colors are Red and Green, Blue and Orange, and Violet
and Yellow, as indicated by the dotted lines. The right half or the wheel represents the warmer colors, while the left side represents
the cooler colors.
|
Every color has a complement, and theoretically, when mixed with an equal portion of that complement, the result is a neutral gray (figure
2). I say theoretically because the relative differences in concentration of paint out of the bottle and its position of the color wheel varies. The distance
traveled from one position to another on the color wheel depends on how much of the second color is added. If you continue to add enough of the second
color, it is possible to move very close to the added color, but you will never quite touch the other edge, This is due to the remaining original "contaminating"
color in the mix. This contaminating color prevents you from getting back to the outer edge of the wheel representing pure color again.
|
Figure 2
Starting at the top with pure red ink, this diagram illustrates the results of adding red's complementary color - green.
|
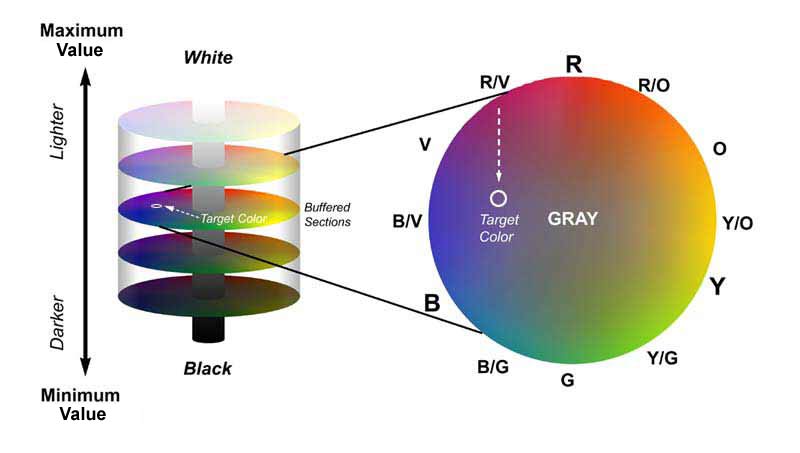
The second part of the system is based on the standard color wheel placed in a cylindrical range of value from light to dark (figure 3). Rather than focus on
colors at the outside edge of the color wheel, this theory almost exclusively utilizes the interior of the color wheel. The reason for this is that colors
utilized in most representational work are not usually pure in chroma. A tendency of novice artists is to use "out of the bottle" applications of
color that are much too pure in saturation to be representative of reality. Most colors within our visual realm tend to have at least some degree of
contamination --or gray-- in them. In relationship to the color wheel this "graying" of color can be represented by the interior of the color
wheel. Theoretically, complementary colors such as red and green mixed equally, will result in a neutral gray. This gray would be represented by the midpoint
or the center of the color wheel, which is halfway between all complementary colors.
 |
If the center of the color wheel is neutral gray, then a cylinder comprised of color wheels has a gray line at its core, This is used to represent a
grayscale from light to dark.
Starting from any given position on the color wheel, as seen in the illustration above, then adding another color, you will notice that the
resulting color has moved directly toward that color across (not around) the color wheel. In this instance adding blue-green to red-violet
moves the color straight towards the added color, as indicated by the arrow. The color becomes grayer nearer the center (as the colors reach
equal proportions). Adding sufficient blue-green would shift the color past the gray center. The contamination by other colors is not always
undesirable. In fact, it is this very nature of color interaction that this system is based upon.
The Nature of Paint
 |
Besides hue, a color can also posses the property of value i.e., lightness or darkness and saturation or intensity of coloration. While spraying
transparent paint, the hue remains the same from when you begin to spray until you stop spraying. The saturation varies at the beginning
when the white of the board shows through, but only to a small degree. The real difference is in the value of the color. The color moves from 0
coverage at the onset of spray to a dark rich color at 100% coverage. As you continue to spray the color continues to darken, in some cases
appearing almost black. If you've ever examined the paint build-up on the lids of your transparent color bottles, you will immediately see this effect.
If you continue to spray the opaque color on the right, there will be no change in hue saturation or value after 100% coverage.
|
Most airbrush artists utilize transparent color exclusively. At first glance, this would seem the logical approach to rendering, but it is
not. While a transparent approach allows an artist to create quickly, it soon becomes apparent that the same aspects of transparent inks
that allow for rapid coverage limit the level of quality that can be achieved.
The difficulty with transparent colors is two-fold. The first problem is that exactness of a color match is almost impossible with
transparent paint. This can cause difficulty with a client with specific color requirements.
The reason that airbrushing with transparent colors is so inaccurate is the catastrophic and unforgiving tendency to "overshoot"
the target color. Holding the airbrush button down for 1/2 a second too long results in a darker than intended color. You cannot add more of any transparent
color that will not darken the painted area further. Airbrushing transparent color is totally unforgiving here and the repair process itself is often the
death knoll for the painting. An error is most often disastrous because corrective measures are almost impossible, or at the very least, time consuming.
The correction of a transparent color usually involves mixing and matching an opaque color.
The only way to be absolutely certain that you do not overshoot your intended target color is to add a small amount of white to your transparent
paint, thus transforming it into an opaque "buffered" color. The addition of white fixes a limit to the value that the color can
achieve at 100% coverage and it prevents the color from going past that limit in hue, saturation, and value whether the paint is 5 millimeters
or 5 feet thick. However, adding white alone will rarely get you to your target color.
All proponents of transparent technique need not despair, however. There are many instances when it is not only appropriate to use transparent
applications, but actually preferable and more efficient.
The most obvious utilization of a transparent approach is the quick and subtle adjustment of and existing color. There are ground rules
for employing this technique, however. The first is that the adjustment can never function from dark to light. The reason is obvious:
Adding transparent ink will never lighten a color.
Secondly, this capacity for transparent ink to rapidly shift colors can also save time in certain situations by elimination the need for
remasking. These specific situations are usually identified by adjacent areas of dark and similar colors. The rationale here is that a
dark area is not as affected by transparent inks as an adjacent lighter area. Therefore it is possible to tint an area without
remasking the dark area next to it. I would of course, advise discretion in this practice.
In all, there are 9 distinct differences between the opaque and transparent colors, all of which are covered in the workshop.
Saturation issues
One of the challenges to creating a superrealistic painting is that paint straight out of the bottle rarely matches colors appropriate
to representing objects in the real world. Most often the intensity or saturation of straight paint is too strong and must be
modulated by some degree. The easiest and most common method of desaturating colors is lightly misting over the offending
color with another color with the airbrush. In a perfect world, this would appear to be the ideal approach. If only this were a perfect world!
There are two important variables that usually run unchecked by the above approach. The first is controlling the color saturation. It would
seem that is merely a matter of knowing when to stop spraying. Unfortunately, the saturation and value of color straight out of the
bottle is rarely suitable even when diluted by misting of mixing with white to cut the intensity.
Correcting a saturation problem might be dealt with by over spraying with a second color, but as mentioned before, this will also darken
the value of the color. There are two things happening at once here. One the saturation of the color is shifting and the value of
the color is getting darker. The target color has a specific amount of saturation and a specific value. Transparent overspraying to
correct colors is like trying to hit two targets at once.
While it is easy to tone a bright red down by overspraying with green, the result will be a duller, but darker red. It might be,
however, that this is the exact red you were looking for, but it would be very difficult to calculate both the percentages of
red and green saturation and their correct ratio by this hit-and-miss approach.
Some artists attempt to match colors by spraying a gray foundation for value, then over spraying with the desired colors. The problem
with this approach is that it is still just a crude attempt to mix colors on the board and the results are almost invariably
compromised. Additionally, value is an intrinsic aspect of color and should not be treated separately. When you observe a
fleshtone, you do not perceive it as two separate entitiesone in black and white and the other as a specific hue. Your perceptual
facilities automatically integrate all aspects of color ad a property of the object you are viewing. It is far more accurate to
establish the desired elements of a color before attempting to spray.
Superrealism is by far the most demanding style of painting because it requires fidelity to the object in every respect. Artists, being
the innovative creatures we are, employ various techniques and tools to overcome the challenges associated with literal
representationalism. Proportion for example, can be addressed by the camera and opaque projector, Frisket film allows for hard edges,
while the airbrush creates soft edges. Texture can be demonstrated by use of conventional brush, eraser, airbrush stipple, sandpaper, or various
other devices. Color and value can be addressed simultaneously by premixing and buffering with white.
Color and value, being the most relative medium in painting, represent two different aspects or qualities found in the same object. These
two aspects are difficult, if not impossible, to observe distinctly from one another, For this reason, people have difficulty matching
colors that fall inside the perimeter of the color wheel. To help understand each term, I would think of value as overall lightness
or darkness as in a gray (black mixed with white). Color is hue, or the position on the outside edge of the color wheel. The combination
of these two elements in a specific proportion will determine the target color.
Now I would imagine at this point a few classic color theorist are complaining that I have failed to mention color saturation. Well,
the truth is I dont need to give color saturation its own category because the proportion of hue to value automatically
determines the saturation of hue (color). Put another way, the amount of hue (color/pigment) added to an amount of gray
(value/black and white) determines the final color saturation in the target color. This means that you are going to match the
target color by mixing the right amount of ink with the right amount of gray, except that we will be creating gray in the cup instead of physically adding gray.
 |
The relative aspect of color poses difficulties due to the error in perceptual judgment we are bound to make when other colors
surround the target color. Trying to match an area of skin next to a bright blue shirt would be a typical example. Because
color is relative, an artist may have difficulty determining the actual color he or she is to mix for a painting. To combat
this, I recommend isolating the target color and thus removing the influence of adjacent colors.
(Figure 5) shows two devices for isolating target colors; both are paper cutouts. I do not recommend the top cutout even though it is the most commonly
used. Although it isolates colors quite nicely, it lacks accuracy. Much better is the single box cutout at the bottom. With this cutout you can
view two colors directly against each other and still isolate them from external influences.
|
For this exercise, I chose a target color a little closer to the center of the color wheel. When the target color is close to gray, I
prefer to start with neutral gray and add transparent color. When the target color is closer to the outer edge of the color wheel, I would initially mix
a hue and tone it down with a complementary color to move toward the target color.
I approach the issue by estimating the amount of gray that must be added to a proportion of pure color to reach the target color. A simple
formula might look like: x amount of gray (a proportion of black to white) + y Amount of color (hue) = target color. The black to white ratio itself can
be frustrating enough. So to overcome this I would recommend thinking in terms of how the target color might appear in a black and white photograph. Another
option might be to enlist the use of a gray scale, finding the value that corresponds most closely to the target color. I must advise you
to not be lulled into a false sense of security here. It is rare that the value will remain constant when colors are introduced. The value will require constant monitoring.
 |
Having mixed black and white to create an opaque and buffered gray, I then test for accuracy by spraying a drop onto the back of a photograph.
The photograph provides and excellent test surface due to its brightness and low absorbency rating. When trying to match a color, I recommend
getting as close as you can to the target before spraying. Never assume, though, that just because the mixed color appears to match in the
mixing cup that you do not have to test it through the airbrush. Values are subject to shifting once sprayed and rarely does a sprayed
color match the wet paint in the mixing cup.
|
By isolation the sprayed or test color with the target color, the differences become apparent (Figure 6, Sample 1). Do not be discouraged
if your initial attempts are wide of the mark. We are only attempting to establish a base line from which to operate. The first attempt to
match a target color can rarely be more than a guess anyway.
By comparing the results with the target color, we can now make another more refined estimate of the direction to take. The neutral gray
appears almost green next to the target color. The value also seems a little light. It appears to need more red-violet and a drop or two of black.
Adding both brings us closer, (Figure 6, Sample 2) but it is still off the mark, too much red violet. The tendency to correct this is usually
to dilute the test color with white and black to subdue the brightness of the hue. It is much easier and accurate to add a drop or two of the
complementary color, in this case, a yellowish green.
This brings the test color to almost a perfect match to the target color (Figure 6, Sample 3). Usually target colors are not achieved in so
few trials. At first expect to go back and forth around the target color at least a dozen times. And remember that when working inside the
color wheel, try to establish values first before attempting to adjust for hue.
When the Target color occupies a very small area, for instance a small portrait, you should cut a small hole in the isolation paper to
correspond to the area of the target color. If the target area is very small, the shadow of the cutout paper itself can interfere with
your ability to see the target color. One solution is to spray directly on frisket film (Figure 6) as it is very thin and casts little shadow.
Dealing with color shift
Sooner or later, we all have to face the dilemma that airbrush inks do not always behave as expected. Often we are forced to compensate for
unexpected changes in hue or value that appear to defy all the rules. The most notorious of these is white. The temptation to use white
as a quick patch for mistakes is hard to resist. It seems reasonable that covering an offending area with white then overspraying with
a new color would salvage the most grievous of errors. Unfortunately, thats where the trouble begins.
In an effort to make a simple correction, a more serious problem has surfaced (figure 7): The colors have shifted toward the blue side
of the color wheel. This phenomenon is known as a color shift and is most apparent on flesh tones and other warm hues. You can always
spot these repair sites because of dull bluish patches, especially noticeable in portraiture.
In addition to colors swinging wildly out of control, overspray from the repair attempt spreads like cancer. In the end, not only did the repair
attempt fail, but it made matters far worse than the small problem it was supposed to correct.
 |
Many manufacturers claim that the reason for this phenomenon is directly related to the manufacturing process of white ink. In an effort to brighten
the white, manufacturers have explained to me that bleaching agents are introduced that have a blue cast. However, recent
research by Zsolt
in cooperation with Eddy and Marissa Wouters proved that flocculation combined with the refractive index of the white pigment is the cause of the phenomena.
|
Even buffered colors are prone to color shift due to the white used to create them. The color shift phenomenon must be taken into account
when mixing and testing buffered colors for a color match. When a sufficient amount of buffered color is sprayed onto a surface, paint begins
to bond with paint, thus ejecting the bleach in the white and creating the blue shift. You will first notice this when the surface coverage
is about 97 percent. For this reason, I recommend testing and spraying buffered colors at 100 percent coverage so that any blue shift can
be accounted for in the mixing and matching stages. Note the stronger saturation at the edge of the spray pattern where the concentration
is not at 100% coverage and therefore has not yet shifted.
Other artists have sought to lessen color shift by clever innovation. Probably the most original is Eddy Wouters solution, which
is to overspray the underpainting with white, thus intentionally invoking a color shift. He then goes about completing the painting knowing
that the impact of any new shift in color will be minimized. I tried this method and it is remarkably effective for reducing the impact of the shift phenomenon.
To effectively address the phenomenon of color shift, I utilized Color Buffer Theory™ and the contention that
complementary colors can neutralize each other. Observing the color wheel, one sees that the complement of blue is orange. By
introducing orange to my white ink I created, in effect, a correcting color. The idea here is to cancel out the bluing effect
with orange. If this mixture of orange and white is sprayed by itself on white board, the orange in the white ink is apparent.
But if the mixture is sprayed over a flesh tone, the result appears lighter without an apparent color shift since the blue and orange have
canceled each other out. The amount of orange in correcting color needs only minor adjustment for virtually any application.
One very minor drawback is that combining orange with blue creates a very light gray, which would prevent a return to the pure
white of the board. If I require a bright white, I might opt for erasing or scratching my way back down to the surface of the CS-10 board.
Another effective method of avoiding color shift is to proceed from light to dark values when applying colors. The color shift
phenomenon is exaggerated when light colors are sprayed over darker colors. So address the light sections first.
One last-ditch effort to combat color shift would be to overspray the area with white and then with orange to cancel out the blue cast.
I dont recommend this as usual approach, but it is feasible.
All material on this page is copyrighted and may not be published, distributed, or reproduced in whole or in part without written consent from Mr. Blair.
|